Latted User Guide
Step-by-step help for your first Latted video, Composer, projects, timeline editing, exports, Spaces, media libraries, workflows, integrations, teams, and credits.
Updated: 2026-09-13
Source: https://www.latted.com/docs
Start here
Latted helps you turn an idea or existing footage into a video you can edit. You describe what you want, give it useful material, review the draft, and make changes before downloading the finished video.
Composer is the assistant that creates and edits your video. A project is where that work lives. You can return to the project to change it later; the downloaded MP4 is the finished video file you can upload or send to someone.
Start with one short video. You can learn the whole process without setting up a Space, building a workflow, or choosing individual AI models.
- Brief: describe the audience, length, shape, story, and ending; attach your references.
- Create: let Composer prepare a draft in an editable project.
- Review: watch and listen; check details, captions, timing, and the ending.
- Refine: ask for a specific change and say what to preserve.
- Export: download the finished MP4 and check it before sharing.
Before you begin
Have a one-sentence goal and any material that must appear: your product photos, a logo, approved wording, a screen recording, or a video you want to edit. You can start with an idea alone when you want Latted to create the visuals.
- Open Latted and choose Sign in if you are signed out.
- Use Continue with Google, or sign in with your existing email and password when that option is shown.
- Complete any introductory questions shown for your account. If you received a team invitation, follow that invitation so you join the correct workspace.
- Open Create and follow your first project below.
If your screen looks different, first check whether you are signed in. Account connections and some advanced controls also depend on what your organization has enabled. The guide names controls where they appear and explains both project editor layouts.
Choose the right starting point
| What you want to do | Start here |
|---|---|
| Make a new video from an idea | Create a first project |
| Change a video you already have | Attach it on Create and describe the edit |
| Continue a Latted video | Open Projects |
| Fix words, timing, framing, or sound | Open the editor |
| Download a finished video | Export your project |
| Reuse the same brand material | Set up a Space |
| Run the same process repeatedly | Use Workflows |
You can read one chapter at a time. Find a topic searches the guide's chapter text, and each heading has a link you can copy. Copy Markdown beside a heading copies that section, including its subsections, prompts, tables, and screenshot links. Screenshots enlarge when clicked. The interactive examples here do not start jobs or spend credits.
Find your way around
Latted becomes easier to use when you save the things you want to use again. Keep product pictures in Images, recurring people in Characters, and favorite narrators in Voices. Use Spaces to bring the right materials together for a brand, campaign, client, or series.
| Open… | To… |
|---|---|
| Create | Describe a new video or an edit to existing footage. |
| Projects | Find your editable videos and check work in progress. |
| Spaces | Organize the materials and instructions you reuse. |
| Videos | Find and create individual video clips. |
| Images | Create pictures and save image variations. |
| Characters | Save a recurring person's appearance and voice. |
| Voices | Design a narrator or turn written words into speech. |
| Workflows | Set up, run, and schedule a repeatable process. |
| Integrations | Connect publishing accounts and Slack. |
| Settings | Manage your team, credits, payment methods, and account. |
If the sidebar shows only icons, use the arrow beside the Latted logo to expand it. Hover over an icon to see its name. Support Chat is near the bottom.
Think of a project as one piece of work and a Space as the reference shelf for many projects. “Autumn launch video” is a project; “Autumn launch” could be a Space containing approved product photographs, the brand brief, scripts, and a narrator. Saving something to a library or Space makes it available to choose. Attach it to the request or add it to the timeline when you want to use it.
A first project, step by step
- Click Create in the sidebar.
- Write a short brief in the large text box. Include the topic or product, who will watch, the approximate length, the desired style, and what the ending should say.
- Click the paperclip to add material. Choose Your Files for files on your computer, or choose a library such as Images, Characters, or Voices.
- Open the sliders control beneath the text box. Under Output format, choose 9:16 Portrait for a tall video or 16:9 Landscape for a wide video. Auto lets Latted choose from your brief.
- Leave Agent mode on Auto for a first project. Enable Extra careful if you want Latted to inspect generated video and retry visible mistakes.
- Click the arrow button labeled Create my video. You can also press Command + Enter on a Mac or Ctrl + Enter on Windows.
- If prompted, sign in and complete any account or credit step shown. Check that the files you want are still attached.
- Look below the prompt box for Project activity. Your new project may first say Planning, Starting, or Working. Open the project when its card becomes available to follow its progress.
- When the project is ready, watch it from beginning to end. Ask for changes in the project’s Composer panel, then export the version you want to use.
The submission message means Latted accepted the request. Ready means the project is available for review. Review the video itself before you share it.
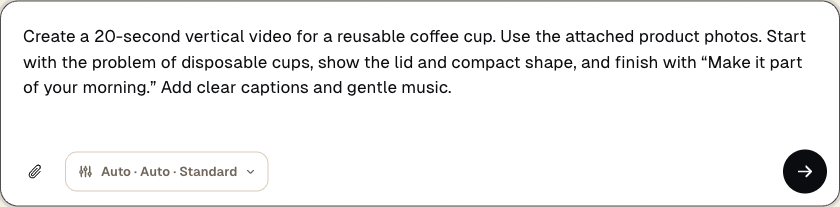
The real Create prompt, shown before submission. Add your own material with the paperclip, check settings, then use the arrow to start. This example was not submitted.
Copy this starter brief
Make a 30-second vertical video introducing our meal-planning app to busy parents. Use the attached screenshots to show these three steps: choose the number of people, select meals, and open the shopping list. Use friendly English narration, large readable captions, and calm background music. End with “Plan your first week.” Use only the features shown in the screenshots.
What makes a useful brief?
| Include | Example |
|---|---|
| The result you want | “A 30-second product introduction” |
| The audience | “Parents planning weekday dinners” |
| The format | “Vertical, for phone viewing” |
| The main message | “Plan meals and create a shopping list in one place” |
| The material to use | “Use screenshots 1–3 in that order” |
| The voice and pacing | “Friendly English narration; give each step time to read” |
| The ending | “Finish with ‘Plan your first week’” |
| Details that must stay accurate | “Keep the product name and interface text unchanged” |
Be specific about facts, prices, product names, and exact wording. For a revision, identify both the change and anything that must stay the same: “Shorten the introduction to five seconds. Keep the remaining scenes and narration unchanged.”
Try an example opens starter prompts. You can adapt one before submitting. If you already wrote a prompt, Latted asks whether to replace it; choose Keep mine to retain your text or Replace to use the example.
Add your files and saved materials
Attachments give Latted the actual material to work with: a logo, product photos, existing footage, a voice recording, a written brief, or a research paper. Tell Latted what each attachment is for. For example: “Use the video as the main footage, the image as a style reference, and the audio as the narration.”
Files from your device
Click the paperclip, choose Your Files, and select your files. You can also drag files onto the Create page. Each attachment appears beneath the prompt with its name and size. Click its × to remove it before submitting.
| Material | Supported formats in the Create prompt |
|---|---|
| Images | PNG, JPG/JPEG, GIF, WebP |
| Video | MP4, MOV, WebM |
| Audio | MP3, WAV, M4A |
| Documents | PDF, Markdown (.md or .markdown), TXT |
Attach one document at a time. You can add multiple media files alongside it. PDFs must have 200 pages or fewer. If one file is rejected, check the message beside the prompt; other accepted attachments can remain selected.
If you have a Word document, save the relevant material as PDF or TXT first. If you have several documents, prepare one focused source document or use reusable text in a Space.
Material already in Latted
While signed in, click the paperclip and choose a category. You can also type @ in the prompt to open the reference picker.
| Choose | Use it for |
|---|---|
| Characters | A recurring presenter or persona; browse Your Library or Latted Library |
| Voices | A saved voice with an available preview |
| Images | Product photos, logos, and other images in your library |
| Videos | Completed videos from your video library |
| Spaces | A group of reusable material, or a specific folder or item inside it |
Search for the item, select it, and check that it appears beneath the prompt. Library names alone in plain text do not replace selecting the actual reference.
For Spaces, open the relevant Space and folders to find the material you need. You can attach a whole collection or a more focused selection. If Latted shows Selection exceeds limits, cancel the review, choose fewer items or a smaller folder, and submit again. An × on an attached reference removes it from this request; it does not delete the original library item.
Choose the video shape and creation settings
Video shapes: 16:9 is landscape; 9:16 is portrait; 1:1 is square; 4:5 is vertical; 4:3 is classic; 21:9 is cinematic. Shape and picture quality are different settings.
Open the sliders control before starting a request.
| Output format | Shape | A practical use |
|---|---|---|
| Auto | Chosen from your brief | When you describe where the video will be shown |
| 21:9 Cinematic | Very wide | A wide presentation or cinematic composition |
| 16:9 Landscape | Wide | Product demos, explainers, YouTube videos |
| 4:3 Classic | Moderately wide | A classic presentation format |
| 1:1 Square | Square | A square social post |
| 4:5 Vertical | Taller than square | A portrait feed post |
| 9:16 Portrait | Tall | Shorts, Reels, and other phone-first videos |
These choices control the shape of the project. Check the requirements of the place where you intend to publish before choosing.
Agent mode controls how Latted organizes the request:
- Auto chooses based on how many videos you ask for.
- Single starts one project.
- Multi-Agent can plan multiple projects from one request, such as a set of different video concepts. Individual project cards appear in Project activity.
For a batch, state exactly how many videos you want and what should differ: “Make three separate 20-second videos for the same product: one feature demo, one problem-and-solution explainer, and one launch announcement.”
Extra careful asks Latted to inspect generated video and retry visible mistakes. This adds review work and may involve additional generation. You should still watch the completed result yourself.
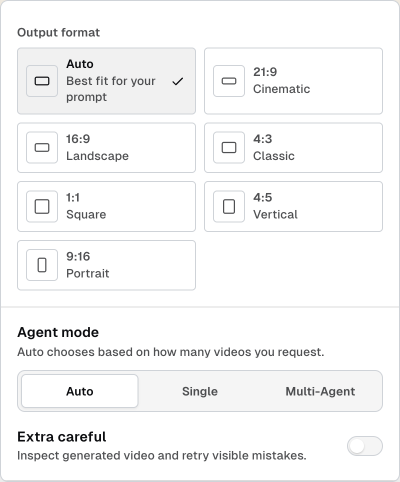
The real run-settings menu. Output format sets the shape. Agent mode sets how the request is organized. More model options appear when available in your signed-in account.
Optional: advanced model choices
For most first projects, keep model selection on Auto. To choose the models yourself, sign in, open the sliders control, and select Advanced models.
- Choose a Composer model if you want to change the model that plans and edits the project.
- Under media settings, choose Custom to select which Video models and Image models Latted can use.
- Keep at least one model selected in each group. Choose a Default within each group.
- Click Apply custom set to use these choices for the request.
- To reuse the same selection, enter a name in Save as a new set… and click Save. You can later select, rename, or delete that saved set.
If a saved set has changed since you selected it, Update from set applies its latest version. Choosing Auto returns media selection to automatic choice.
Follow a request after submitting
Stay on Create to start another request or open the new card under Project activity to inspect this one. The card is temporarily unavailable while Latted sets up the project. View all opens Projects, where you can find older work.
| What you see | What to do |
|---|---|
| Planning or Starting | Give Latted time to prepare the project. |
| Working | Open the project to see the current activity when its card is available. |
| Ready | Open and review the project. |
| Needs attention | Open the project if possible and read the latest message. |
| No card for an older project | Open Projects or click View all. Create shows recent activity. |
Avoid submitting the same request again just because the page is still preparing it. First check the project card and the project’s activity. If the prompt reports Could not choose an agent mode, retry or select Single or Multi-Agent explicitly in settings.
If a credit dialog appears, read its threshold and reload amount before deciding whether to enable automatic credit purchases. Where offered, Create blank project instead opens a project you can build manually.
Find and organize your projects
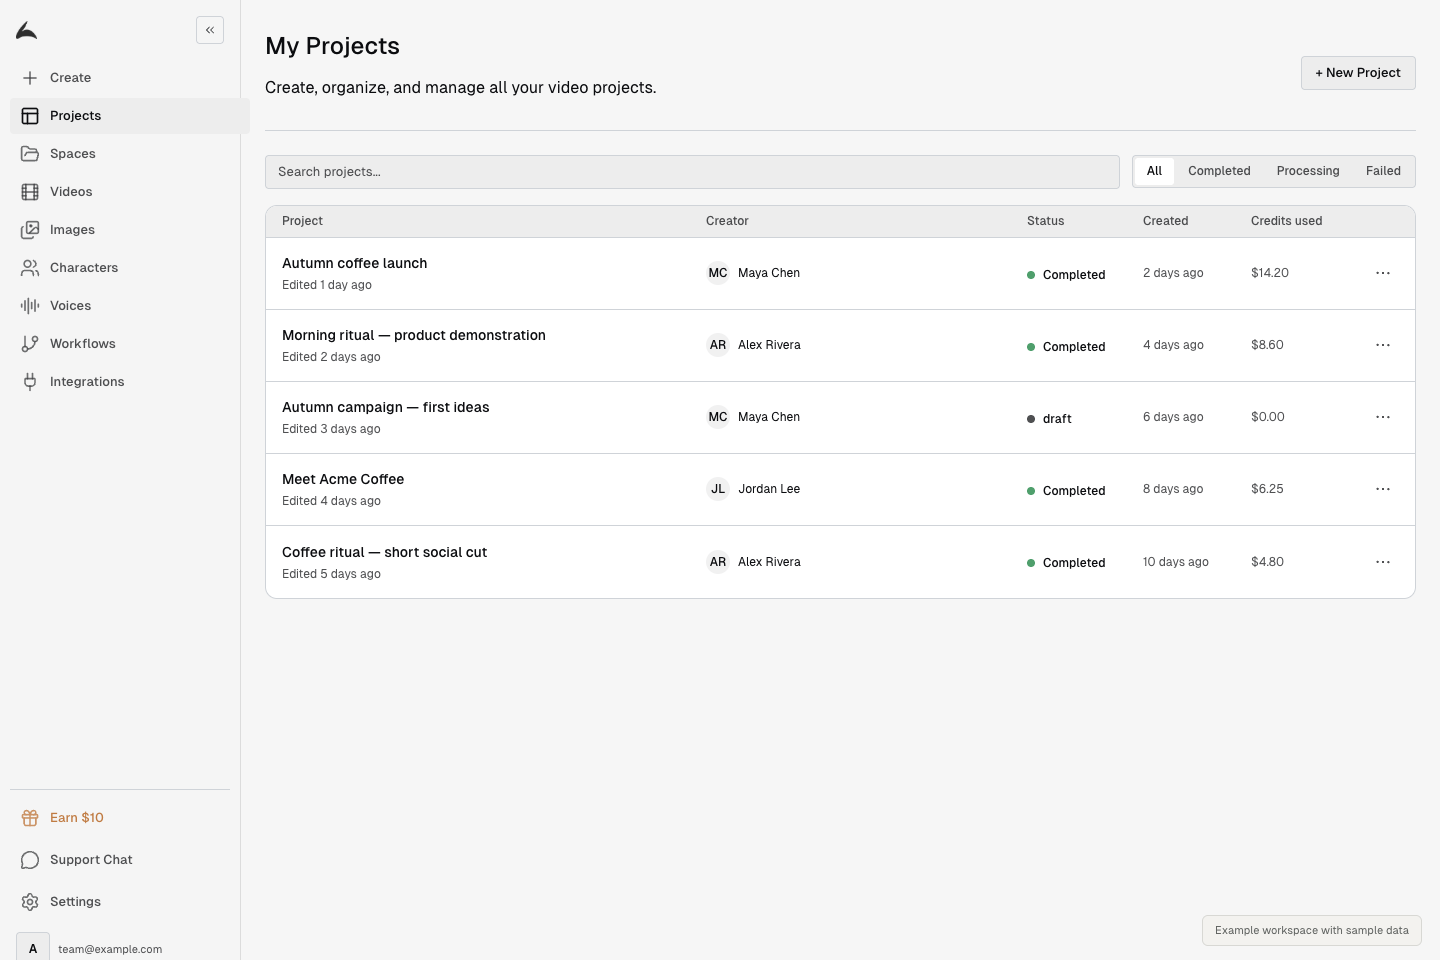
Projects brings ongoing and completed work together. This screenshot uses the actual app with sample data. Use search and the status filters to find the video you want.
- Open Projects from the app navigation. The page is titled My Projects.
- Use Search projects… to find a project by name.
- Choose All, Completed, Processing, or Failed to narrow the list.
- Click a project row to open it. If you have several pages of projects, use Prev, Next, or a page number at the bottom.
Each row shows the project name, creator, status, creation date, and credits used. The smaller line below its name shows when it was edited. Processing means work is still underway; open the project to read the latest Composer activity. Completed means that task has finished; play the result before you export it. If a project says Failed, open it to see what happened and decide what to try next.
To start another project, select + New Project. Choose From a Prompt to describe what you want and supply reference files, or From Scratch to open a blank project.
To rename a project, open it and edit its title at the top. In the editor with Composition settings, double-click the title first, type the new name, and press Enter. In the other editor, click directly into the title field, type the name, and click elsewhere.
To delete a project, open the … menu on its row and choose Delete Project. Read the confirmation before confirming: the app permanently removes the project data, and this action cannot be undone. Download anything you want to keep first.
Get to know the editor
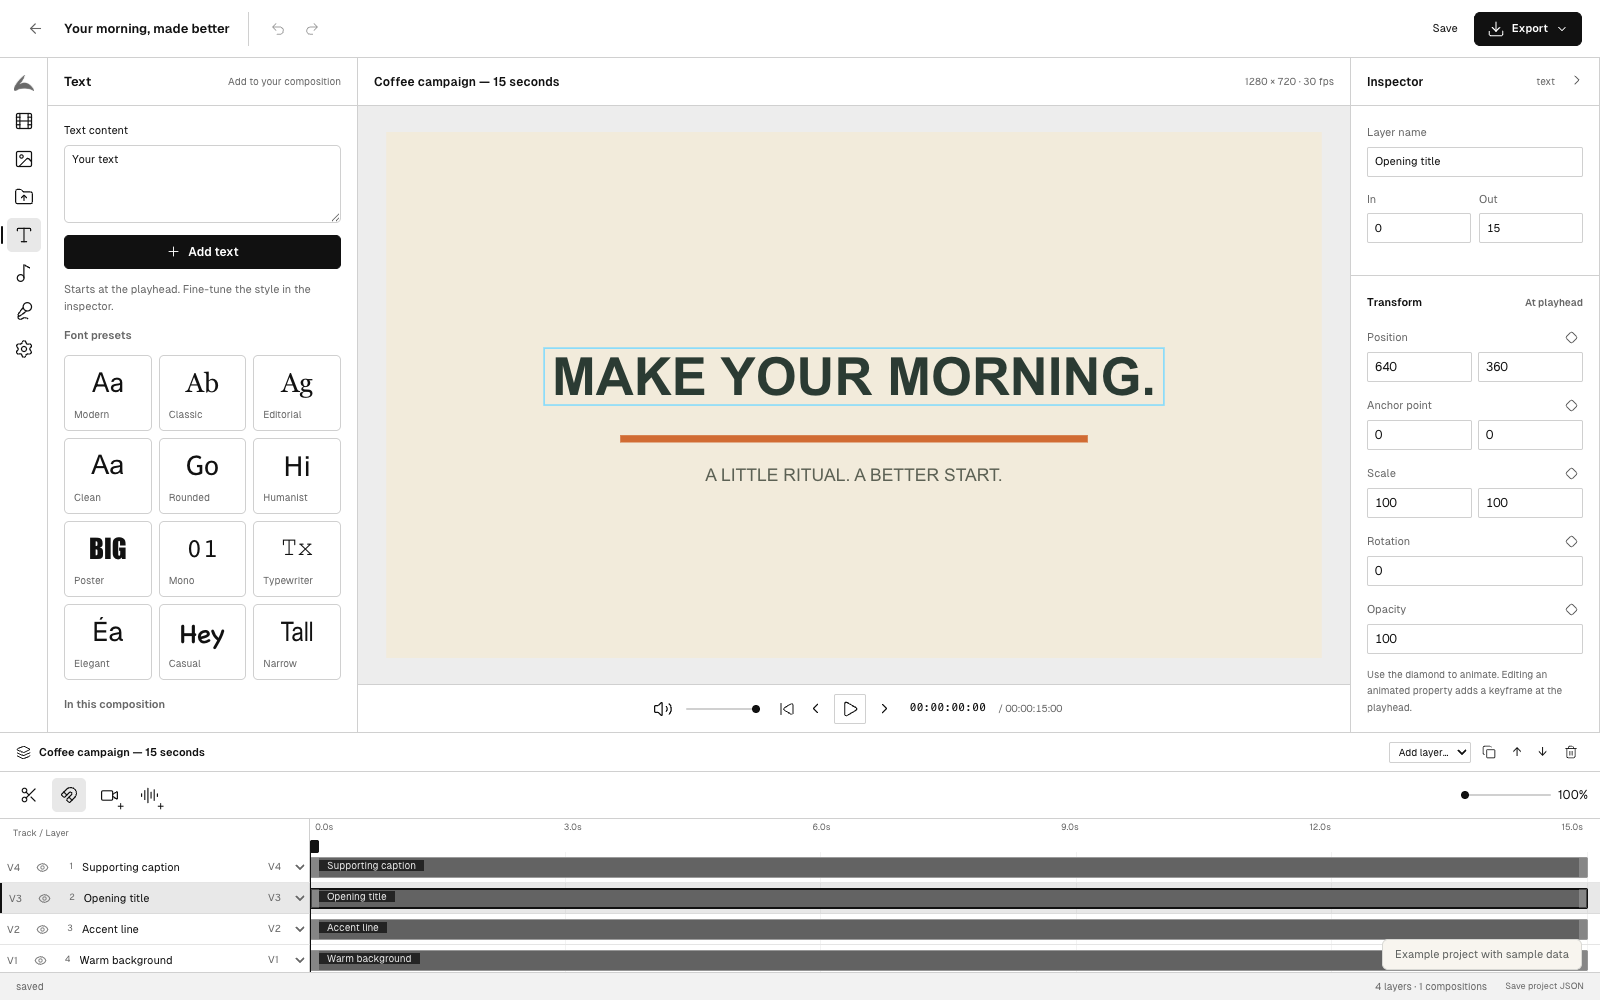
The actual Composition editor with a simple sample project. The selected title appears in the preview and timeline; its Inspector controls are on the right. Click to enlarge.
The editor has four main areas:
| Area | What you do here |
|---|---|
| Tools on the left | Talk to Composer Agent, browse Videos and Images, Import files, add Text, make Music & SFX or Voiceover, and open Settings. |
| Preview in the middle | Watch the video, check framing, and select visible items. |
| Inspector on the right | Change the selected item's appearance, sound, or other available properties. |
| Timeline at the bottom | Control when each item appears and how long it stays. |
Drag the dividers to make a panel larger or smaller. Collapse the Inspector when you want more preview space, and expand it when you are ready to adjust something.
A clip is one piece of media on the timeline. A layer is an item in the video, such as text, an image, a video clip, or an audio track. The playhead is the line marking the moment you are looking at. A composition, when that label appears, is an individual video canvas and timeline inside your project.
Which editor instructions should I follow?
Latted opens the appropriate editor for your project. You do not need to choose an editor to continue working. The main workflow is the same, but some controls differ:
| If you see… | Follow these instructions |
|---|---|
| Composition settings, an Add layer… menu, and export choices including AEP | Use the instructions marked Composition editor below. |
| A simple Export video dialog and a six-choice Aspect ratio grid in Settings | Use the instructions marked Timeline editor below. |
Create and revise with Composer
Open Composer Agent on the left. In Describe the video or your next edit…, explain the result you want. Click the upward arrow to send, or press Enter. Use Shift+Enter for a new line without sending.
You can use Composer for the full video or for one small change. A useful request includes the purpose, audience, length, shape, material to use, text or narration, and anything you want preserved.
For a first version:
Create a 20-second portrait video introducing our ceramic travel mug. Use the attached product photos. Start with the mug on a café table, show the lid and handle, and end with “Make your morning.” Use a warm, quiet mood, soft instrumental music, and no voiceover. Keep the product's real color and logo.
For a focused follow-up:
Change the closing text to “Your morning, made better.” Keep the timing, footage, colors, music, and all other text the same.
For a timing change:
Shorten the opening shot to 2 seconds. Keep every later shot in the same order and remove the empty space between shots.
For an edit tied to an exact moment:
At 00:08, lower the music while the voiceover speaks. Bring it back up after the sentence ends. Keep the spoken words unchanged.
Add files to a request
Click the paperclip to attach files, then describe how Composer should use each one. For example: “Use the video as the source to edit; use the image only as a color reference.” Check the attachment names before sending. You can remove a draft attachment with its × button.
Files attached to a message give Composer material and context for that request. Import is the tool for placing media into the project yourself. Uploading a reference does not by itself mean it will appear in the finished video.
Understand activity and plans
After sending, you may first see Preparing your task…, Starting, or startup steps. These mean Latted is getting the request ready. As work proceeds, Composer shows activity, generated-media cards, and a plan when one is available. Waiting for generated media to finish means a media request is still underway.
Open View full plan when available to read the proposed sequence of work. Close the plan to return to your preview. A progress indicator or completed step helps you follow the work; the preview and downloaded video are where you check the result.
Wait for the current edit to finish before making manual changes to the same project. Some controls become unavailable while Composer updates it. When the run ends, play through the result, then send a precise follow-up if needed.
Stop, continue, or start a new conversation
- Stop Composer: while a run is active, the send arrow becomes a square. Click it to request a stop. The button may be unavailable during the first moments of startup. Stopping does not undo edits already made.
- Continue the conversation: send the next request in the same Composer panel after the run finishes. This keeps the earlier messages together.
- Previous sessions: click the clock/history icon and select a conversation to read its prompts and activity. You can return to earlier conversations from this menu.
- New agent session: click + in the Composer header to begin a fresh conversation about the same project. The existing project stays in place.
History is a history of conversations, rather than a list of saved video versions. To reverse a recent manual edit, use Undo. To change a Composer result, describe the change in a follow-up request.
Run settings
Open the sliders button beside the prompt to see Run settings. This contains the available choices for the assistant and media generation. If you are new to Latted, you can keep the default selections and concentrate on your instructions.
Extra careful asks Composer to inspect generated video and retry visible mistakes. Consider it when visual details matter especially much. Additional checking and retries can make a task take longer and may use additional credits; it is still useful to review the final video yourself.
Bring your own photos, video, and audio
Open Import from the left-hand tools. Use the upload area to choose files or drag files onto it. You can add images, videos, and audio.
Composition editor
- Move the playhead to where the media should begin.
- Open Import, then click Upload media or drop your files into the upload area.
- Wait for the upload to finish. The uploaded media is added to the project and timeline at the selected moment.
- Find it again under Uploaded media. Click its thumbnail to preview it.
- Use Add to place another instance on the timeline.
Search with Search files…, or filter with All, Video, Images, and Audio. If nothing matches, use Clear filters.
Replace changes a library file used by the project. Choose a file of the same kind: a video for a video, an image for an image, or audio for audio. Existing uses of that file keep their timing and transforms, so replacing it can affect several layers. Play the result to check the new content and framing. If an imported project shows Missing file · Relink to restore, use Relink to supply the missing file.
Timeline editor
- Open Import, then click Drop files here or drop files into that area.
- Wait until they appear under Imported to this project.
- Click the + button on a file to add it to the timeline.
Videos are added to the end of the main video sequence. Images and audio are added at the playhead. A new image can begin as a small overlay in a corner; select and reposition it, or ask Composer to make it fill the frame. Uploading a file into this library alone does not put it in the video.
Reuse generated media
Open Videos or Images to browse media you have generated. These libraries can include work from other projects. A file becomes part of the current video when you add it to the timeline.
- Click a thumbnail to open a larger preview.
- Check that it is the image or clip you want.
- Click Add to timeline, or use the + on its library card.
- Close the preview and inspect its placement in the timeline.
If a card says Generating…, wait until it is ready. If a search does not find older media, use Load more when available. In the Composition editor, search covers the media currently loaded in the library.
Use Create video or Create image to open the corresponding creation tool. Describe the asset you need and choose the options shown. New generated media appears in the library; preview and add the version you want to use.
Watch and edit the timeline
Timeline example (15 seconds):
| Time | Picture |
|---|---|
| 0–5 seconds | Introduce the problem |
| 5–10 seconds | Show the product |
| 10–15 seconds | Show the ending and next step |
Move the playhead to preview a moment. Clips beside each other play in sequence; picture, text, voice, and music can overlap. This is an illustrative example.
Click Play to watch the video, and click again to pause. Space also plays or pauses when your cursor is not in a text field. Click Back to start or Go to start to begin at the opening. In the Composition editor, Previous frame and Next frame help you inspect an exact moment.
Use the timeline to move the playhead to the moment you want to inspect. The preview shows what appears there. Use the Timeline scale slider to make clips wider for precise editing or narrower to see more of the video. This changes your view of the timeline; it does not change the video's length.
Move, trim, split, and remove
- Click the clip or layer you want to change.
- Drag the middle of its timeline bar to move it earlier or later.
- Drag a start or end edge to trim when it begins or ends.
- To cut it into two pieces, place the playhead inside it, select it, and click Split or press ⌘K on Mac / Ctrl+K on Windows.
- To remove the selected item, use Delete or Backspace. In the Composition editor you can also click Delete layer.
If Split is unavailable, move the playhead away from the very beginning or end of the selected clip. Trimming a video chooses a shorter part of its source; it does not generate more footage.
Undo reverses a recent editor change, and Redo reapplies it. Use the buttons at the top, or ⌘Z / Ctrl+Z and ⇧⌘Z / Ctrl+Shift+Z.
Tracks, gaps, and layers
A track is a row of items in your video. Visual tracks hold video, images, or text; audio tracks hold sound. Add a row with Add video track or Add audio track. Empty extra tracks can be removed with their remove control.
Magnetic keeps clips together on the main video track when you make supported timing edits. If you want to leave space on that track, turn Magnetic off. A visible gap can be removed with Delete gap or Delete gap before…, which brings later clips forward.
In the Composition editor, use the track selector beside a layer to choose its track. Use Move layer up and Move layer down to change its order in the layer stack. The eye button hides or shows an item; hidden items are disabled in the composition, so restore visibility before exporting if you want them included. Duplicate layer creates a copy you can edit separately.
Add text and captions
Add a title or label
Move the playhead to the moment where the text should start, then open Text.
- In the Composition editor, enter Text content and click Add text, or choose a font preset. Existing text appears under In this composition; click an item to jump to it and edit it.
- In the Timeline editor, choose a style to add a text item at the playhead, then change its words in the Inspector.
Select the text in the preview or timeline. Use the Inspector for its words, font, size, color, background, bold/italic/underline style, and alignment. Drag the text in the preview to adjust its position. In the Composition editor, double-click visible text, make the change, and click Apply text; Cancel keeps the original wording.
Adjust the text item's timeline edges to control when it appears. Play across both edges to make sure it arrives and leaves at the right moment.
Add spoken-word captions with Composer
For captions that follow speech, ask Composer directly:
Add captions for the spoken words. Use sentence case, two lines at most, and white text on a dark background near the bottom. Keep the words clear of the speaker's face. Preserve the original video and audio.
To revise them:
Change “Latte” to “Latted” in the captions at about 00:06. Keep the caption timing and style the same.
When captions exist as editable text layers, select them to adjust their text, style, or timing. Words already baked into an uploaded video are part of that picture and may require a Composer video-editing request. A caption request does not guarantee a separate subtitle-file download; use the available export controls for the finished video.
Make voiceover, music, and sound effects
Voiceover
- Open Voiceover.
- Choose a Voice from the picker and listen to an available preview.
- Enter the exact spoken words in Script. The editor shows the character count; the current limit is 2,500 characters per request.
- Adjust Speed or Pitch if needed. Begin with 1× speed and unchanged pitch if you are unsure.
- Click Generate voiceover.
- Listen to the result under Project audio or Generated audio.
- Put the playhead where it should begin and click Add to timeline or +.
For longer narration, create several clear sections and place them in order, or ask Composer to handle the full narration and assembly. Generation creates an audio file; adding it to the timeline puts it into the video.
Music and sound effects
- Open Music & SFX.
- Describe the sound, mood, and any desired duration. The current prompt limit is 3,000 characters.
- Click Generate audio.
- Preview it, then add it to the timeline at the desired moment.
For example:
A gentle instrumental piano bed for a 20-second product video. Calm, warm, no singing, with a soft ending.
Or:
A short, subtle ceramic cup set-down sound on a wooden café table. No voices or music.
Balance the sound
Preview mute and preview volume control what you hear while editing. Change the selected clip's audio in the Inspector when you want to change the exported video.
- Timeline editor: select a video or audio clip and adjust its Volume slider.
- Composition editor: select a video or audio layer, use Audio enabled to include or silence its sound, and adjust the left and right Volume · dB values. Lower values make the sound quieter. Keep both sides equal for a balanced result unless you want a deliberate left/right effect.
To work on a video's soundtrack separately, right-click the video clip and choose Extract audio. Latted places its sound in a separate audio clip, and the video becomes silent so you do not hear it twice. Adjust the new audio clip, then replay the section.
Adjust appearance and make simple animations
Color
Select a video clip and open Color grade in the Inspector. Choose Warm, Cool, Cinema, or Mono, or use None for the ungraded look. Fine-tune exposure, contrast, saturation, temperature, and tint. Reset grade or the reset icon returns the grade to its neutral settings.
Check more than one moment of the clip: a look that suits a dark shot may be too strong in a bright one.
Position, size, and opacity in the Composition editor
Select a layer to open its Transform controls. Position moves it, Scale changes its size, Rotation turns it, and Opacity controls how visible it is. Values are shown for the current playhead position. Text and image layers can also be dragged in the preview; selected images have a resize control.
Make a simple fade with keyframes
A keyframe records a property's value at one moment. Two keyframes let Latted change that value over time.
- Select a text layer and move the playhead to where the fade should begin.
- Set Opacity to 0, then click the diamond beside Opacity to record that value.
- Move the playhead forward about one second.
- Set Opacity to 100. Once a property is animated, editing it at a new moment adds a keyframe there.
- Play the section to watch the fade.
Click a diamond in the timeline to jump to a keyframe. Linear changes evenly between values; Hold keeps the first value until the next keyframe. Clicking a property's active diamond removes the keyframe at that moment. You can use the same idea for movement, scale, or audio volume.
The Composition editor also offers Add layer… → Shape or Solid for simple graphics. A shape can be a rectangle or ellipse, with editable size and fill. If you prefer to work in words, ask Composer for the animation or graphic you want.
Change the video's shape or length
Open Settings. Choose the aspect ratio that suits the place you plan to use the video: 16:9 for a landscape frame, 9:16 for a tall portrait frame, 1:1 for a square, or another listed shape.
Changing the canvas shape can change how your media fits. Replay the full video and check faces, products, titles, and captions after changing it. For a careful reframe, ask Composer:
Adapt this video to 9:16 portrait. Keep the speaker and product visible, move text inside the new frame, and preserve the spoken words and music.
In the Composition editor, Settings also lists the project's compositions. Select one to work on its timeline. Composition settings lets you change its name, width, height, frame rate, duration, and background. Duration is measured in seconds. If you shorten the composition, check the ending so you do not cut off speech or an important shot. New users can usually leave frame rate as it is.
Save your work
Latted saves project edits as you work. You can also click Save at the top. Check that saving finishes before you leave. The Timeline editor shows Saved beside the title; the Composition editor shows the save state at the bottom.
If you see Locked or a message that Composer is updating the project, wait for the current run to finish. If you see Save failed, check your connection and try Save again.
In the Composition editor, a recovered unsaved draft may appear on your next visit. Restore draft brings it back, Download draft saves a copy to your computer, and Discard draft removes that recovery copy. If the project changed elsewhere, use Download my draft before Reload saved project when you want to preserve the local work. Reloading replaces the current view with the saved project.
Export and use your finished video
Before exporting, play the opening, a middle section, and the ending with sound on. Check spelling, captions, music level, framing, and the final call to action.
Composition editor: choose your format
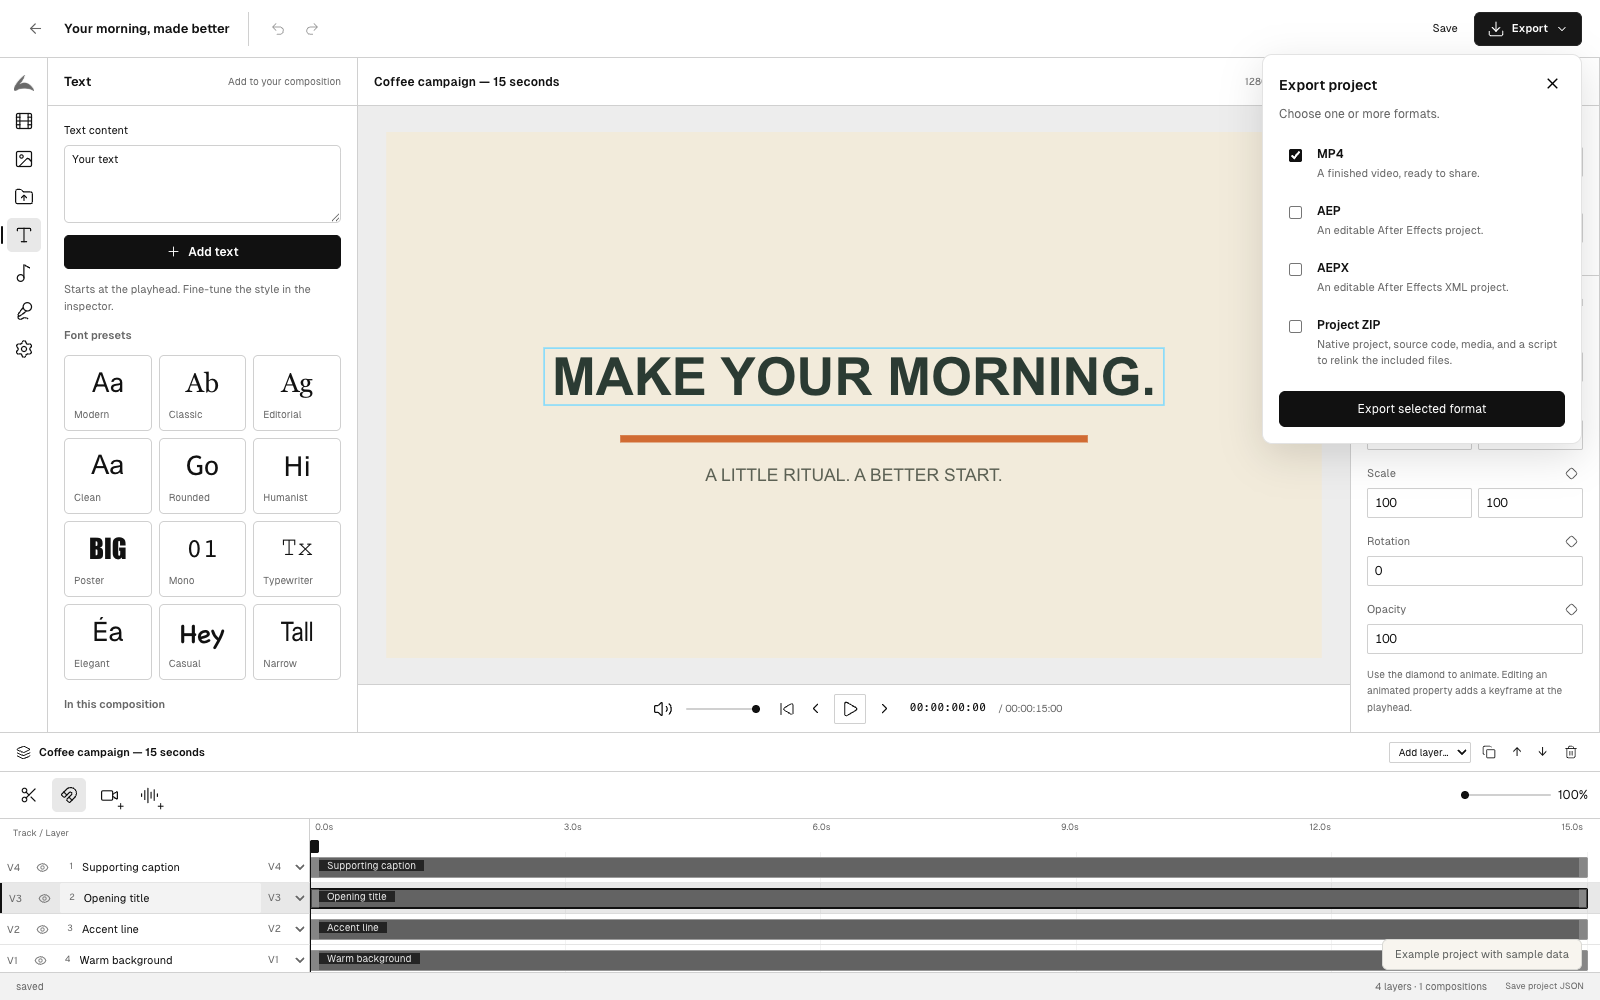
For a finished video, choose MP4. Other formats are for an editable After Effects handoff. This is the actual export menu on a sample project; no export was started.
- Click Export in the top-right corner.
- Leave MP4 checked for a finished video you can upload or send to someone.
- If needed, also select AEP, AEPX, or Project ZIP for an After Effects handoff.
- If the project has related tabs and you want all of them, check Include all project tabs.
- Click Export selected format or Export [number] formats.
- Wait for the listed export stages to finish. The download starts when the selected outputs are ready.
One format for one project downloads as its own file. Multiple formats or multiple project tabs are collected into latted-projects.zip. Open the ZIP on your computer to get the individual files. Empty video timelines are skipped. If every selected video timeline is empty, Latted tells you there is nothing to export.
If the top-right button says Download instead of Export, the task has existing rendered results available. Click Download to retrieve those results.
Timeline editor: export MP4
- Click Export in the top-right corner.
- In Export video, click Start export.
- Wait while Latted prepares and renders the video.
- Look for Render complete. Download started., then check your browser's downloads.
If related projects appear as tabs at the top, Export all creates their videos and downloads them together as latted-projects.zip. The dialog shows each project's status and skips empty timelines. This exports the related tabs, rather than every project in your account.
If the download does not arrive
- Choose Download again or Download ZIP again when available.
- If the Timeline editor offers Open video, open the ready video from that link and use the browser's save/download control.
- If an export failed, use Try again. For a multi-project export, successfully prepared files are retained while failed items are retried.
- Use New export after making changes when that button is offered, so the download reflects the new version.
Continue in background hides the export dialog while you use the editor. Keep that browser tab open for progress and the download to finish. Reopen Export to check progress.
The exported MP4 is the file to upload to a social platform, send to a colleague, or store in your own files. Open the downloaded file and play it once before sharing it.
Download one source file
Right-click a media clip in the timeline. In the Composition editor, choose Export original media. In the Timeline editor, choose Export Video, Export Image, or Export Audio.
This downloads that clip's source file. To include the timeline's cuts, text, effects, and sound mix, export the finished project as MP4.
Continue in Adobe After Effects
This section applies to projects with the Composition editor and its AEP/AEPX export choices. You can make and export regular videos without using Adobe After Effects.
To bring an existing After Effects project into Latted, open Import, find After Effects project, and select Import project. Supported choices shown in the app include AEP, AEPX, JSX, and AE JSON. The import opens as a new project. If its media is missing, use Relink under Uploaded media.
For a handoff, select AEP or AEPX in Export. Project ZIP bundles the native project and its media with supporting files, which is useful when moving the work to another computer. Read any Compatibility notes shown during import or export, and open the exported project in After Effects to check it.
The browser editor supports common 2D layers and simple animation. Some advanced After Effects features—including effects, masks, expressions, 3D, and time remapping—are outside its browser editing support, and fonts can look different. Latted's MP4 export uses its browser preview appearance. Use Settings → After Effects compatibility for the in-app guide when working with native projects.
Find, create, and remix video clips
Click Videos in the sidebar to browse generated videos across your projects and videos created directly in the library. Projects is where you open a complete editable project. Videos is useful when you want to find a particular clip, make a new clip, or create a variation of an existing one.
Find and watch a video
- Open Videos.
- Use Search by prompt or project… to find a clip by the words in its prompt or its project.
- Hover over a card to see a muted preview. Cards can show the video’s shape, length, model, and creation time.
- Click the card to open Remix this video. Use the player controls to watch the source with sound.
- If the video belongs to a project, click Open in project to continue working in that project.
Use Load more at the bottom to browse older items. A Generating card is still being created and cannot be opened yet. Generation failed or Failed means that generation needs attention; it does not mean a playable result is available.
Create a video directly in the library
- Click Create Video on the Videos page.
- On Create a video, write a prompt describing one scene or clip. Include the subject, setting, movement, and visual style.
- Under Model, keep the selected model or choose another. Search models or input type… helps you find models that accept the kind of material you have.
- Check Inputs. Add anything marked required, then add optional references if you want them used.
- Choose Aspect ratio, Duration, and Resolution where those controls are available. The selected model determines the available choices.
- Read the cost estimate if one appears. The page notes that the final cost may vary.
- Click Generate video. You can also press Command + Enter on Mac or Ctrl + Enter on Windows.
- Return to Videos to find the new card and follow its status. Use Back to Videos if you want to leave the form before submitting.
This creates a library video. To use it in a larger project, attach it from Videos in the Create or Composer reference picker once it has finished.
Example clip prompt:
A close-up of a folded blue linen napkin being placed beside a white ceramic plate on a pale wooden table. Soft morning light comes from the left. The camera moves slowly closer while the hand leaves the frame. Keep the scene simple and realistic, with no text, logos, or additional objects appearing.
What the input tiles mean
| Tile | What to add |
|---|---|
| Start | An image to guide the opening frame |
| End | An image to guide the final frame; add a Start image first |
| Ref | Images to guide appearance or content |
| Video | A video reference for models that support it |
| Audio | An audio reference for models that support it |
| Character and Motion | A character image and a motion reference video when using a motion-control model |
| Source | The video to modify when using a video-edit model |
The available tiles and attachment counts change with the model. A message beneath Inputs explains anything missing. If a model is unavailable in the menu, read its explanation; your current attachments may be incompatible. Remove the conflicting attachment or choose a compatible model.
Some models show Keep source audio or Keep original sound. Select it when you want to retain the supplied recording’s audio. Motion controls may also offer Match image or Match video to choose which reference guides the character’s framing.
Remix an existing video
- Click a completed video card to open Remix this video.
- Watch the source and read its Original prompt if shown.
- Describe the change you want, such as “Keep the product and camera movement; change the background to a light gray studio.”
- If useful, click Add images to provide references. The form accepts up to four images, and the selected model may use fewer. Choose a model labeled Video + image references to use images.
- Choose Keep source audio if that option appears and you want the existing sound retained.
- Click Remix. The new variation appears in the gallery as another video.
Review the new variation to check the intended change and anything that should have stayed consistent. Use the full project’s Composer when the change concerns several clips, narration, captions, or the overall sequence.
Remove a video
Click the card’s trash button. In Delete this video?, choose Delete to remove it or Cancel to keep it. Make sure you have selected the intended video before confirming. If deletion fails, the page shows Failed to delete video and keeps the card available.
Organize a campaign in Spaces
A Space holds reusable images, videos, audio, characters, text, and folders. You can create a Space for one campaign or keep a long-lived Space for your brand.
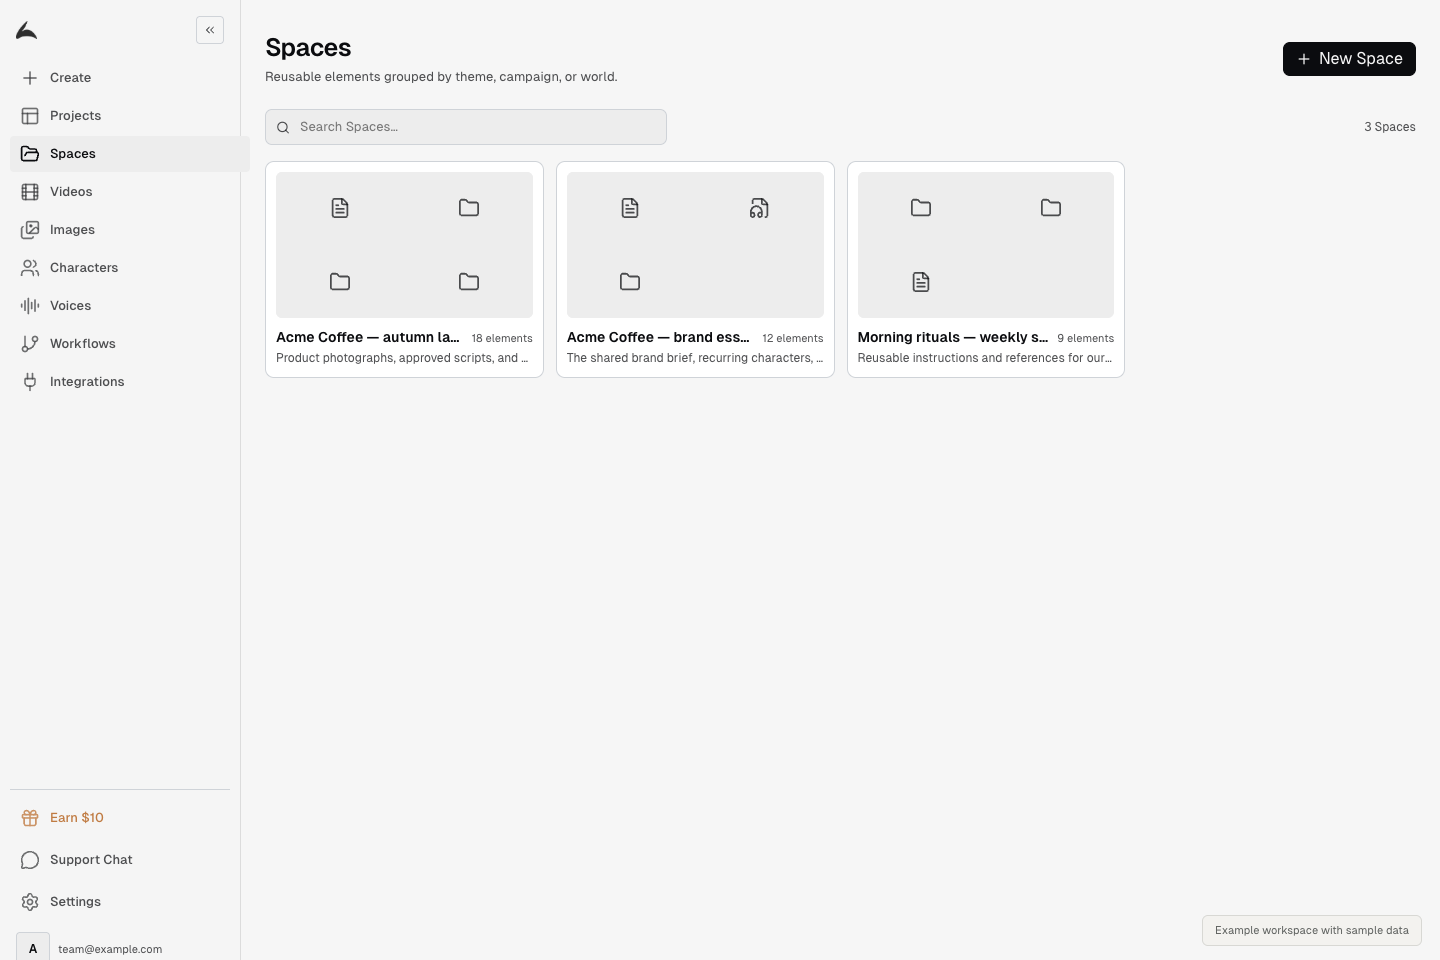
One Space can hold material for a brand, campaign, or recurring series. Actual app screen with sample data.
Create your first Space
- Select Spaces in the sidebar.
- Click New Space.
- Give it a recognizable name, such as “Acme coffee — autumn launch.”
- Add an optional description explaining what belongs here: “Product photographs, approved claims, warm kitchen references, and the narrator for our autumn campaign.”
- Click Create Space.
Your Space opens, ready for materials. To change its name or description later, click the title area, make your changes, and click Save.
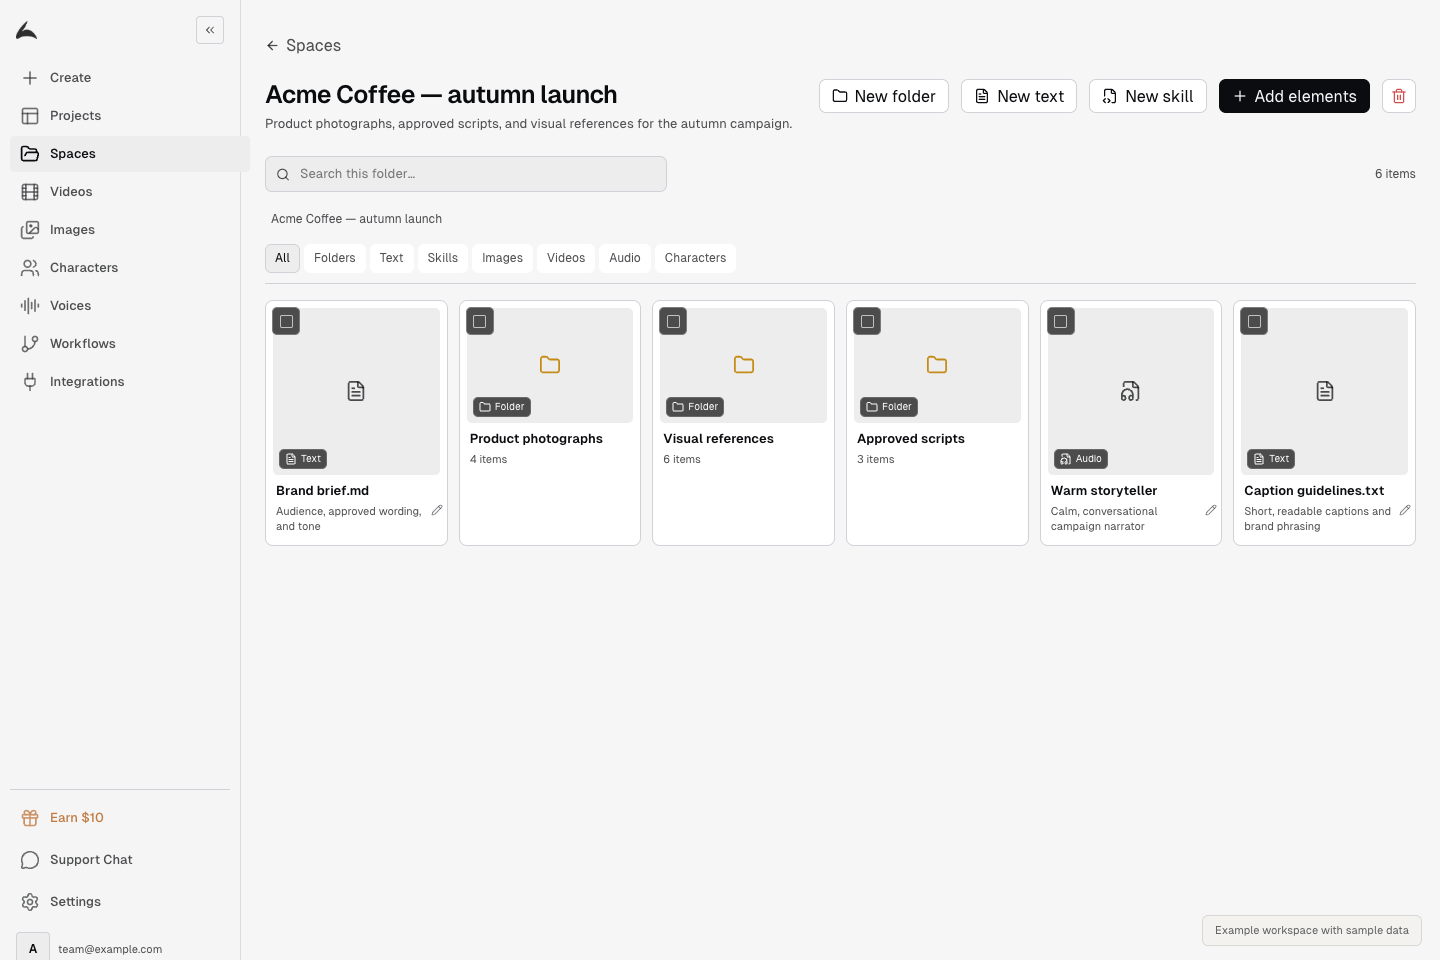
Inside a Space, use folders to organize materials and Add elements to bring in files. The brand and folder names here are sample data.
Add existing materials
- Open the Space, then the folder where the materials should go.
- Click Add elements.
- Search the library and select the materials you want.
- Click Add with the selected count.
The selected materials appear in the Space. Adding a library image or character lets you organize an existing item without making a separate creative version of it.
Upload files or a folder
Use Add elements → Upload files to choose files from your computer. Use Upload folder to bring in a folder and its supported contents. Latted recreates the folder structure inside the Space. You can also drag files directly onto an open Space.
Supported materials include common image, video, audio, and text files. For a brand brief, a plain text file or Markdown file is a simple choice. The import message lists files that could not be added; an upload can succeed for some files while skipping others.
Example folder structure:
Acme coffee — autumn launch
├─ Brand brief
├─ Product photographs
├─ Visual references
├─ Approved scripts
└─ Recurring characters
Keep folder names practical. “Product photographs” tells a teammate more than “Assets 2.”
Create folders and written references
To make a folder, click New folder, enter its name, and click Create. Open the folder to add materials inside it. The path above the materials lets you return to its parent folder or the top of the Space.
To write a brief directly in Latted:
- Click New text.
- Enter a name, such as “Brand brief.txt.”
- Choose Plain text for simple writing, or Markdown if you want headings and basic formatting.
- Write or paste your content.
- Click Create.
A useful brand brief answers these questions: Who is the audience? What is the product? What should the audience understand or do? Which facts and wording are approved? What should the visual style feel like? What must remain consistent?
Open a text file to edit it. Markdown files offer edit, split, and preview views. Find searches within the open file. Click Save, or press Command+S on Mac or Ctrl+S on Windows, before closing. Wait for Saved; Unsaved means your latest changes have not been saved yet.
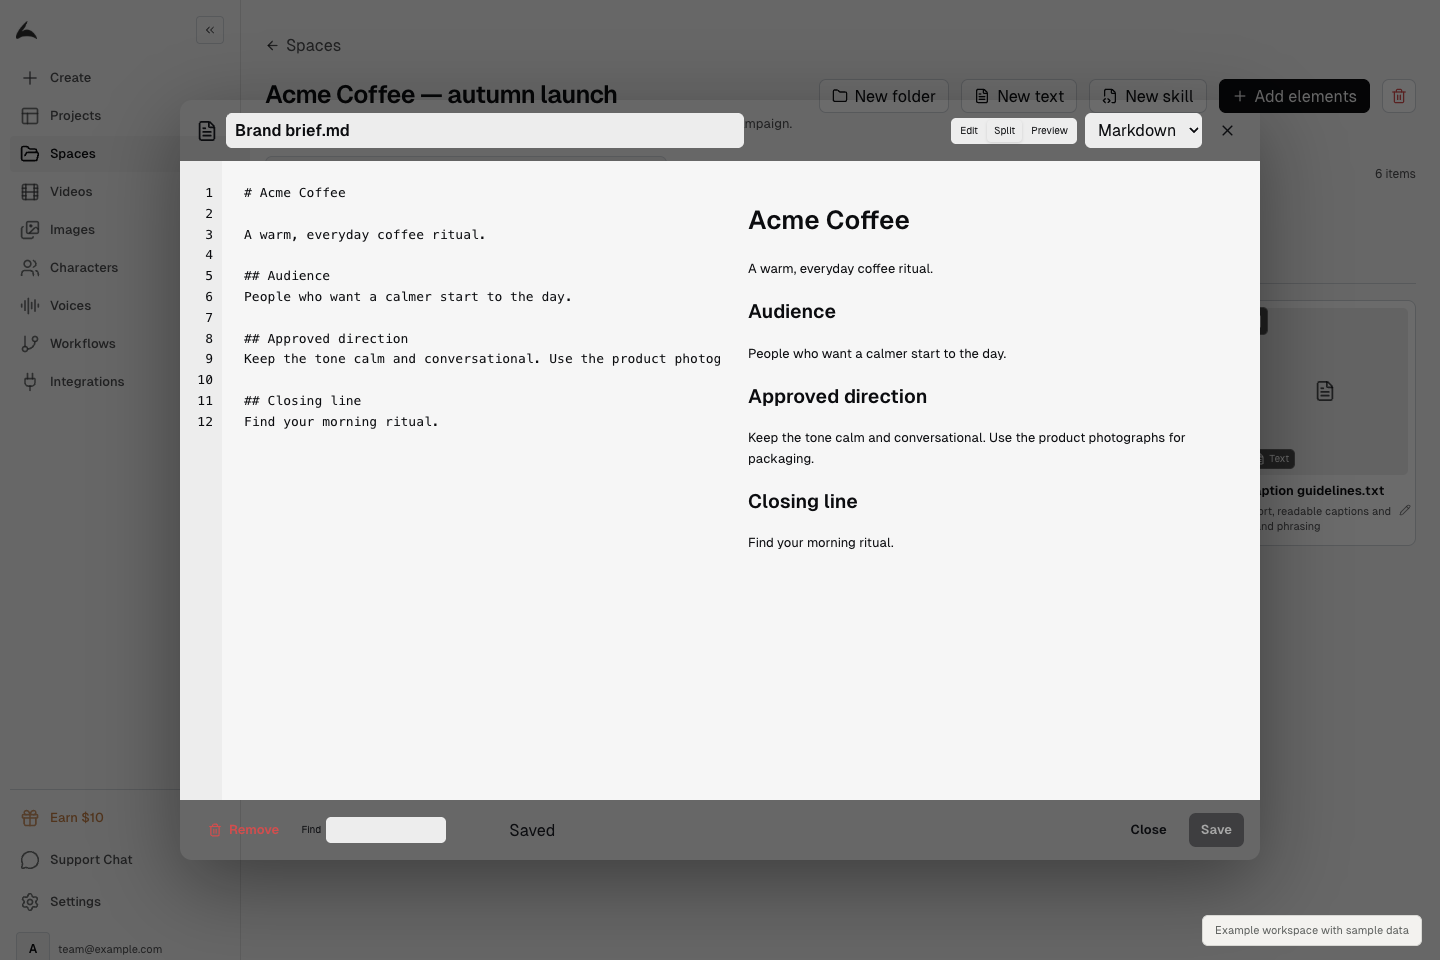
Write approved wording and brand instructions directly in a Space. Save your text before closing. Actual app screen with sample content.
Save a reusable set of instructions
A skill is a written process you want Composer to follow again. You might use one for your standard product demonstration, your brand's caption rules, or the structure of a recurring video series.
- Open the Space and click New skill.
- Give the skill a short, descriptive name, such as “weekly-product-demo.”
- In Description, explain when it should be used: “Use for our weekly 30-second product demonstrations.”
- In Starter instructions, describe the process in ordinary language.
- Click Create.
For example:
Start by explaining one everyday problem. Show the product solving it in a believable setting. Use the approved product claims from the brand brief. End with “Find your morning ritual.” Keep the tone calm and conversational.
Latted creates a folder containing the instruction file. You can open the folder to edit the instructions later. Keep the instruction file's name as SKILL.md so Latted continues to recognize it as a skill.
Use your Space in a project
Saving materials in a Space makes them available to attach to your request. When writing a request in Composer, open the attachment menu or type @, choose Spaces, and find the Space you want. You can attach the whole Space, open it to choose a folder, or select individual materials. Use the attach control beside the item; Preview lets you inspect a text item before attaching it.
Attach a folder when only that part of the Space is relevant. Then explain the materials' roles:
Use the attached brand brief for approved wording and the product photographs for the exact packaging. Use the visual references only for lighting and color. Make a 30-second vertical launch video.
Choose the item from the menu instead of only typing its name. The attached reference appears with your request, making it clear which saved material you mean.
Find, move, duplicate, and remove materials
Search Spaces finds a Space by its name or description. Inside a Space, Search this folder looks within the folder you have open. The type filters help narrow the view to folders, text, skills, images, videos, audio, or characters. Clear the search and filters if something seems missing, then check the folder path.
Select items using the small selection control on each card. The toolbar then offers:
- Move: choose another folder in the same Space. Space root means the top level.
- Duplicate: make another copy of the selected Space items.
- Delete: remove the selection and, for folders, the materials inside them.
Open a media item to see its preview and description. Editable item names can be changed by double-clicking the name. Editing the name or description of a linked library image or character updates that shared library item, so use wording that will make sense wherever it is reused.
Read the removal message before confirming. Removing a library image or character from a Space leaves its library entry available. Text written inside a Space has no restore option after deletion. Deleting a folder also removes its contents from the Space.
When a Space upload or action fails
- A file was skipped: check the file type. Plain text and common media formats are the easiest choices; a folder may contain unsupported files alongside supported ones.
- A text file is too large: split it into smaller documents. A text file can be up to 1 MiB, roughly 1 MB; an entire Space can hold up to 100 MiB of text.
- A folder will not move: choose a destination outside that folder and its own subfolders.
- Nothing appears in search: clear the filters, check the folder path, and return to the Space's top level.
- An edit says Failed: keep the text open and retry saving. Do not close a file while it still says Unsaved or Failed.
Create and reuse images
Use Images for pictures you want to reuse across projects: product shots, settings, graphics, character appearances, and alternate views.
Generate a reusable image
- Open Images and click Create New.
- Describe the image you need. Include the subject, setting, framing, lighting, and any text that must appear.
- Add reference pictures when you need Latted to follow an existing product, person, or design. Explain what each reference controls.
- Choose an Aspect ratio suited to the intended use. A square suits many reusable product images; a tall image suits a vertical video.
- Check the available image model and use Enhance prompt if you want help making the instructions more specific.
- Submit the request and wait for the generated image to open.
Example:
A clean product photograph of the attached coffee bag on a warm cream background. Keep the package shape, label, logo, and printed wording exactly as in the reference. Soft window light from the left, gentle shadow, square composition, no extra props or text.
Give the result a name you can find later. The Images search checks names and descriptions of what was generated.
Edit an image or add another view
Open an image to work on it. Describe the change you want, generate a preview, inspect the result, and click Save when you want to keep the edited image.
For a reusable variation, use the image's Add menu. Generate with AI creates an alternate view or variation, while Upload image adds a picture you already have. These related images stay grouped under the original image.
Give precise directions for targeted changes:
Keep the product, label, camera angle, and crop unchanged. Change only the background from cream to pale blue.
An image is reusable after saving, but it is not automatically included in every new project. Attach it from Images in the reference menu when you want Composer to use it.
Build a recurring cast with Characters
A character is a reusable identity with a name, appearance, description, and, when provided, a voice. Use one for a recurring presenter, a fictional cast member, or a narrator who appears on screen.
My Characters shows your workspace's characters. Character Library lets you browse Latted's library. You can search by name or keywords, and the library's filters help narrow the choices. Open a character to inspect its appearance and listen to its voice preview when available.
Create a character
- Open Characters → My Characters → New Character.
- Enter a Name.
- Describe the Physical appearance: face, hair, age, clothing, build, and details you want to recognize in future content. Latted generates a portrait from the description.
- Under Voice source, choose Describe a voice or Upload reference.
- If describing a voice, give its tone, accent, pace, and texture. If using a recording, upload an audio or video file; only its audio is used.
- Write the exact line you want to hear in Preview script.
- Click Generate preview and listen. Use Regenerate if you want another result.
- Create the character when the preview is ready.
Voice setup is optional when you choose Describe a voice and leave its description empty. If you provide a voice description or recording, generate a preview before creating the character. Changing the source, voice description, or preview script requires a fresh preview.
Character voice reference files must be 10 MB or smaller. The supported choices include WAV, MP3, OGG, M4A, MP4, MOV, WEBM, M4V, MKV, and AVI. The preview script can contain up to 1,000 characters.
Example appearance:
Maya, a woman in her early thirties with a short dark bob, round glasses, and a relaxed navy work shirt. Friendly, thoughtful expression. Keep the glasses, hairstyle, and shirt consistent.
Example voice direction:
A clear, warm alto with a neutral American accent. Conversational pace, gentle energy, and natural pauses. She sounds like a helpful colleague explaining something she uses every day.
Update a character
Open one of your characters to rename it or edit Physical appearance and Description. Click Save for each edited field. Use Change image to choose an existing image as its primary visual reference. If that picker is empty, create an image on the Images page first.
The appearance picture is the visual reference used for later generations. Updating the written appearance description and changing the picture are separate actions; check both when changing a character's identity.
Latted library characters are available to inspect and use, with editing controls reserved for your own characters. Attach a character from the request's Characters menu when creating new content, and explain the part they should play.
Use Maya as the presenter. Keep her face, glasses, hairstyle, navy shirt, and voice consistent. Have her demonstrate the product in a bright home kitchen.
Use Delete character only when you want to remove that reusable character. Read the confirmation before continuing.
Design voices and generate speech
The Voices page holds saved voice identities. Designing a voice chooses how the speaker sounds. Text to Speech makes a recording of a script in that saved voice.
Design and save a voice
- Open Voices and click Design Voice.
- Write a Voice description. Describe the qualities you want to hear, such as a calm documentary narrator or an upbeat conversational presenter.
- Choose a reference method: Description only, Audio clips, or Image.
- For Audio clips, use Add audio to attach up to three short references. Keep each clip within the displayed limit of 30 seconds and 10 MB.
- For Image, use Choose image to provide one JPEG, PNG, or WebP picture. This designs a voice to suit the pictured character.
- In What should it say?, enter a sample line that represents the content you plan to make.
- Click Generate Voice and listen to the Voice preview. Use Regenerate Voice if needed.
- Give it a recognizable name and click Save Voice.
For an ongoing series, use a representative preview line with the pacing and emotion you expect. “Welcome back. Today we're looking at the tiny design decision that changed the whole product” reveals more about a narrator than a single word.
Generating a preview does not save the reusable voice by itself. Click Save Voice before closing if you want it in your library.
Turn a script into speech
- Click a saved voice card to open Text to Speech.
- Paste the exact words you want recorded. Each request accepts up to 2,500 characters.
- Adjust Speed if the delivery should be slower or faster. Leave it at 1.00× for the starting pace.
- Adjust Pitch only if you want a lower or higher sound. 0 keeps the starting pitch.
- Click Generate Speech.
- Listen under Latest generation. Use its download button to save the audio.
You can generate another take while the window is open. Older takes appear under Earlier in this session; download the ones you want before closing. For a longer script, split it into complete paragraphs and generate them separately.
Search saved voices by name, description, or associated character name. The play control on a voice card auditions its preview. Deleting a saved voice requires confirmation and cannot be undone.
Repeat a process with Workflows
A workflow is a reusable sequence of steps. A run is one attempt to carry out that sequence with a particular brief and materials. For example, one workflow could turn a product brief into concepts, then create a video and request approval before publishing.
Start by running a workflow your team has already prepared. Build or change the process once you know what you want to repeat.
Run an existing workflow
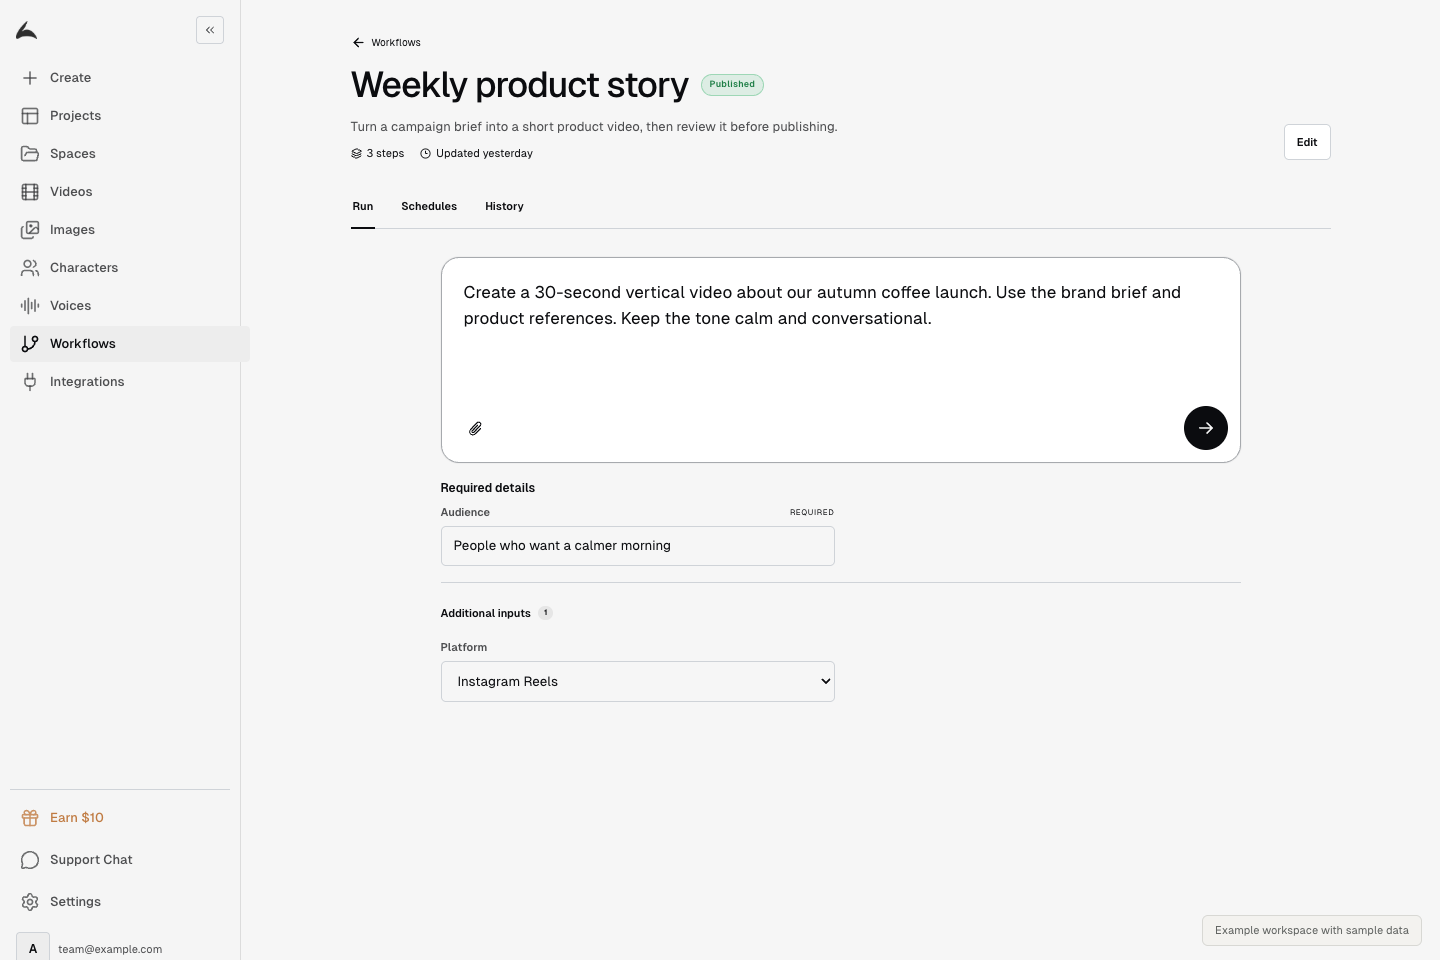
A workflow can be reused with a different brief each time. This actual Run screen contains sample data; the example was not run.
- Open Workflows and select the workflow.
- Stay on the Run tab.
- Write this run's brief in the request box. State the topic, audience, desired output, and anything specific to this run.
- Attach relevant files or select saved references. Use @ or the attachment menu as you would in Composer.
- Complete any Required details. Open Additional inputs if the workflow offers optional choices.
- Click Run.
The run opens so you can follow its progress and inspect the result. Some older workflows show a form instead of the brief box. Fill in the fields shown, then click Run.
If Latted says Publish this workflow to run it, choose Open setup, finish the setup, and publish it. If it says The published version will run, there are newer draft edits that have not been published yet.
Understand the run page
- Status tells you whether the run is working, waiting, finished, or failed.
- Maximum cost is the run's configured ceiling; Actual cost shows the usage recorded for it. The ¢ symbol means cents.
- Workflow graph shows the steps and their connections. Click a step to inspect its result.
- Node results lists the steps in order. Here, “node” means a workflow step.
- Final result shows the finished output when one is available.
Use Go to project when a result links to an editable Latted project. Text and other results may offer Copy or Download. A run can finish without a successful final output; read the message and inspect the step results if this happens.
Refresh reloads the run's status. Cancel requests that an active run stop. Retry as new run starts a separate attempt after a run finishes, so use it when you are ready for another attempt and its associated usage.
Return to the workflow's History tab to reopen previous runs.
Review an approval request
Some workflows stop before publishing a post or activating paid ads. The Workflows page and run page show an approval notice when a decision is waiting.
- Expand the notice with Review.
- Click Inspect to check the run and proposed action.
- Check the content, destination account, and any advertising settings.
- Choose Approve to let that action proceed, or Reject to decline it.
Approval requests show an expiry time. A waiting approval can explain why a workflow appears to have stopped making progress.
Create or edit a workflow
- Choose Workflows → New workflow, or open an existing workflow and click Edit.
- Rename the workflow at the top so teammates can recognize its purpose.
- Click Assistant to describe the process you want in ordinary language.
- Follow the conversation and inspect the Live workflow as it changes.
- Click individual steps to review their settings. The panel on the left lets you add available step types yourself.
- Review what information the workflow asks for, which connected accounts it uses, and where its final result goes.
- Click Publish when the process is ready to run.
Example request to the workflow assistant:
Create a workflow that takes a product brief and reference images, writes three short video concepts, and creates one vertical video from the chosen direction. Ask for approval before publishing anything. Let the person running it provide the campaign name and audience.
The exact steps available depend on the tools enabled for your workspace. Start with a small process you can understand, then add more steps.
Edits are saved as a draft while you work. Publish makes that draft the version used for runs. Publishing a workflow makes its process ready to use; a publishing step within that workflow is the separate action that sends content to a connected social account.
A step's Run node control tests that step. It may require the results of earlier steps and can perform real work. Read the test details, especially for publishing or advertising steps. Keep required approval steps in place for actions you want someone to review.
Schedule repeat runs
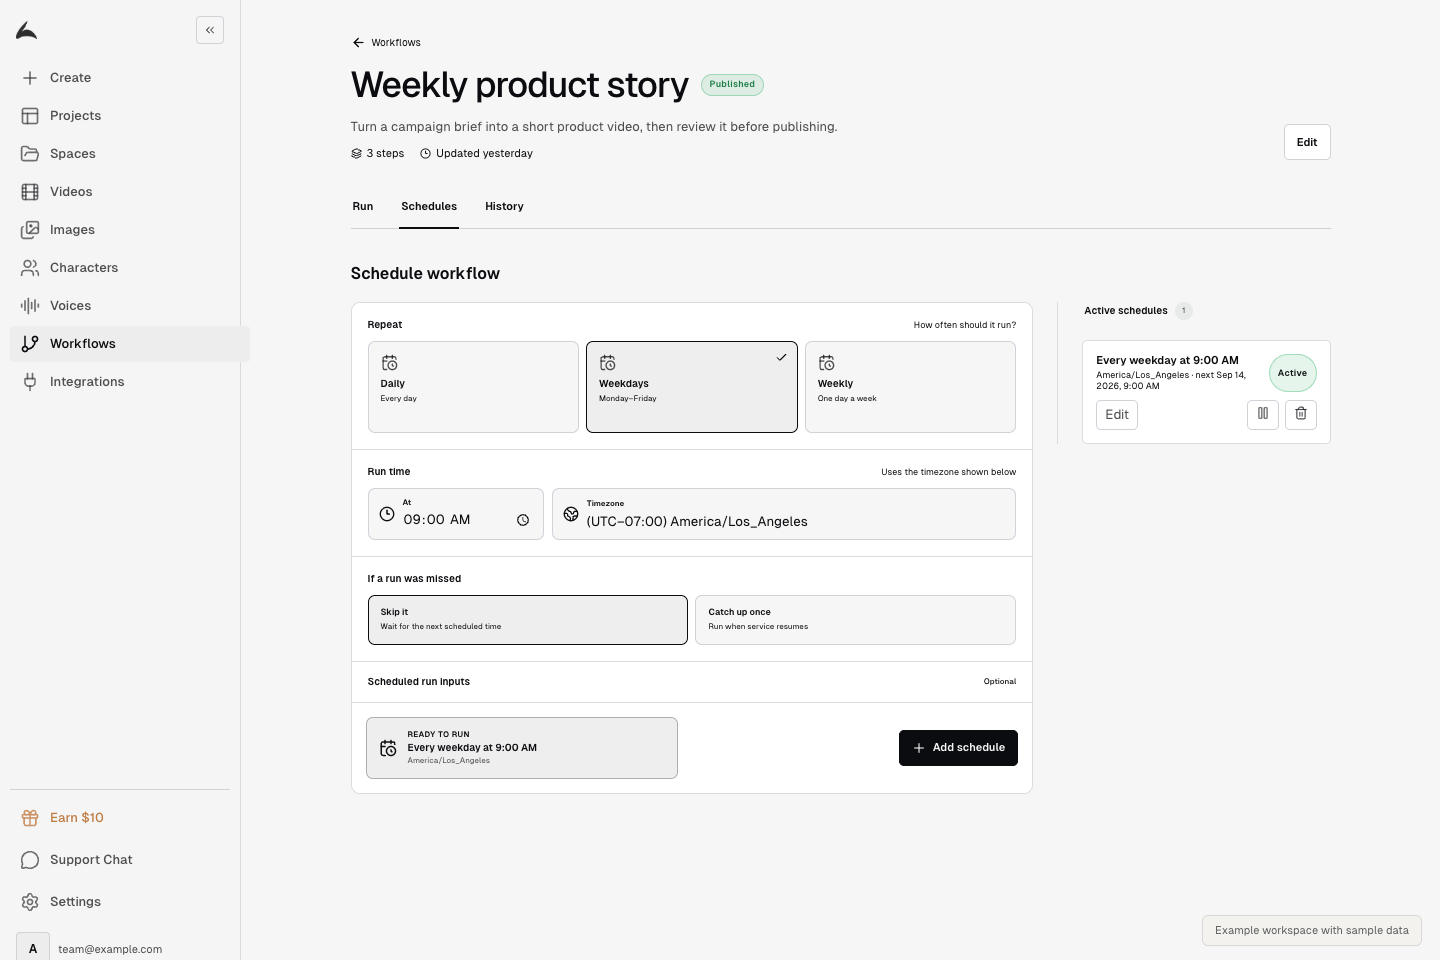
Check the repeat pattern, time, and timezone together. This example shows a weekday schedule in the actual interface using sample data; no schedule was created.
- Open a published workflow and select Schedules.
- Choose Daily, Weekdays, or Weekly. For Weekly, choose the day.
- Set the Run time and check the Timezone.
- Under If a run was missed, choose Skip it to wait until the next scheduled time, or Catch up once to run once when service resumes.
- Fill in Scheduled run inputs. These are the values reused for every scheduled run.
- Click Add schedule.
The schedule appears with its status and next run time. Use Edit to change it, the pause control to pause it, the play control to resume it, or the delete control to remove it. Scheduled runs use the latest published version of the workflow. If a previous scheduled run is still active, another overlapping run is skipped.
Publishing new workflow changes can therefore change what an existing schedule does. Review the scheduled brief and inputs whenever the process changes substantially.
When a workflow will not run
- Run is unavailable: publish the workflow and fill in its required details.
- The old behavior still runs: draft edits need to be published.
- A step is waiting: check for an approval request and inspect its expiry.
- A social account is missing: connect it in Integrations, then return to the workflow settings and choose it.
- A scheduled run uses the wrong brief: edit its Scheduled run inputs; these are separate from a one-time manual brief.
- A run fails: open History, select it, and inspect the step that failed before starting another attempt. Include the workflow name and run link if you contact Support Chat.
Connect social accounts, advertising, and Slack
Open Integrations to connect the outside accounts a workflow should use. A connection makes an account available; choose the intended account again in the workflow that will use it.
Connect a social publishing account
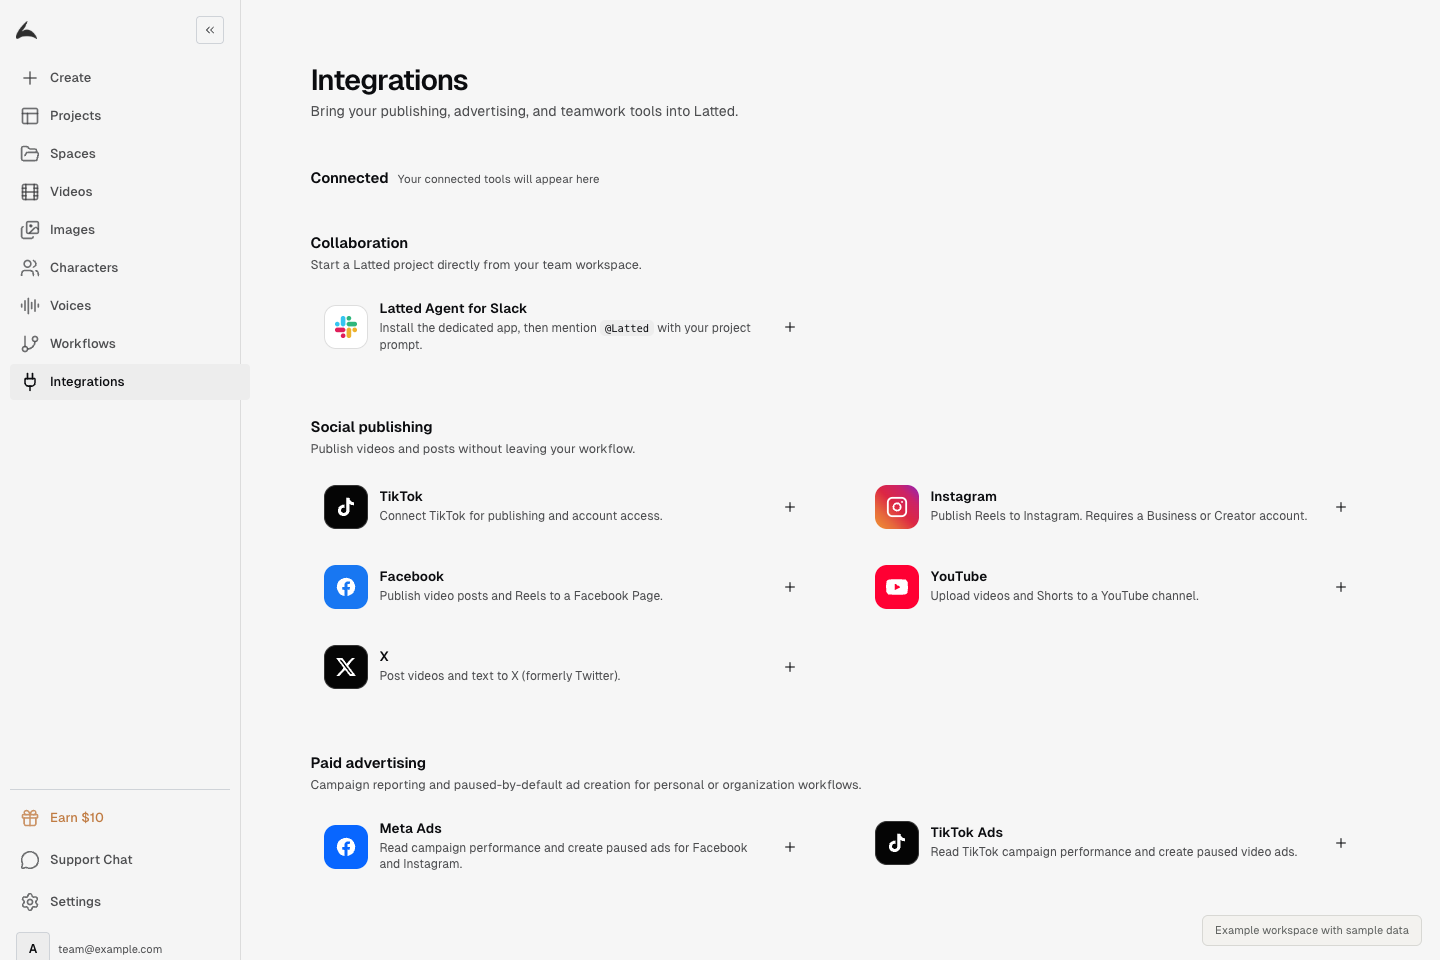
Connect the services your workflow should use. This example workspace shows enabled integration sections; the connections available to your organization may differ.
The Social publishing section offers TikTok, Instagram, Facebook, YouTube, and X.
- Find the service and click its connect control.
- Complete the sign-in and permission steps in the window that opens.
- Return to Latted and check that the correct account appears as Connected.
- Expand the service card to inspect connected accounts. Use its add control to connect another account when needed.
Instagram publishing requires a Business or Creator account. Facebook uses a Page. YouTube connects a channel. Connect the account that should receive the content, especially if you manage multiple brands.
If the connecting window does not appear, check whether the browser blocked it. If Latted says Finish connecting, finish the steps in that window and return. Use the account's remove control when you want to disconnect it; workflows can no longer publish through that removed connection.
Connect paid advertising
If Paid advertising is available in your workspace, it offers Meta Ads and TikTok Ads. These connections let supported workflow steps read campaign information and create ads. An organization owner manages ad connections.
Connect the provider, complete its authorization steps, then expand the card to review the available ad accounts. Use the sync control if account information needs refreshing. An unavailable account can show a reason beside it.
Ads are created paused. Activating an ad is a separate workflow action that ordinarily needs approval. Connecting an ad account or creating a paused ad does not itself start spending.
Some workspaces expose Unattended ad activation and Allow unattended ad changes controls. These allow approved automation to make ad changes without a person waiting. They require the relevant workspace, workflow, and run or schedule settings, plus spending limits. Leave them off if you want to review activation. When a budget field says minor units, USD uses cents: 1,000 means $10.
Create from Slack
If Latted Agent for Slack is available, an organization owner can install it from the Collaboration section.
- In Integrations, find Latted Agent for Slack and use Install Slack app.
- Complete the Slack installation for the intended workspace.
- In Slack, mention @Latted with a project request.
- If prompted, follow the account-linking message and sign in to Latted.
- Check the account shown on Link Slack to Latted, then click Link this account.
- Return to Slack to continue.
Slack project commands use the linked Latted account's organization access and billing eligibility. Each teammate should link their own account. Account-linking links expire after 15 minutes and can be used once. If a link is expired or incomplete, return to Slack and request a fresh linking prompt.
You can review connected Slack workspaces in Integrations. Owners can add another workspace, reconnect when needed, or disconnect one.
Work with your team
Latted calls a shared workspace an organization. Members can collaborate on shared projects, images, characters, voices, Spaces, and workflows. Materials you add to a shared organization are available to its members to use and manage.
Open Settings → Organization to see the organization name, your role, members, and invitations. Owners have additional controls for invitations, member removal, the organization name, and billing.
Invite a teammate
- As an owner, open Settings → Organization.
- Under Invite a teammate, enter the teammate's email address.
- Click Send invite.
- Check Invitations for the status.
Invitations expire after seven days. Use Resend if the teammate needs a new invitation. Revoke withdraws a pending invitation. To remove an existing member, use Remove beside their name and confirm the action.
Accept an invitation
Open the invitation link and check the organization name and invited email. Sign in with that email, or create the account offered on the invitation page. If you are signed into a different account, choose Switch account. Then choose Join when the details are correct.
If you already belong to another organization, read the Organization change panel. It explains whether you will leave the old organization or move your personal workspace into the new one. Leaving an existing shared organization removes your access to its shared content; that content stays with the organization. Moving a personal workspace transfers its projects and assets into the new organization.
If you own a shared organization with other members, Latted may require its ownership or membership to be resolved before you can join another organization. Use Open organization settings and contact Support Chat if you need help with that transition.
Manage credits, payments, and usage
Open Settings for your account's billing information. Your organization owner manages shared payment methods and billing changes. If a control says it is managed by the owner, ask that person to make the change.
Read your balance and plan
Credits shows the available credit balance. The sidebar may also show a balance and a top-up shortcut. If you have a subscription, the Subscription section shows the plan and its allowance or renewal information. Use the amounts and terms displayed in your account and checkout when deciding what to buy.
An allowance, a credit balance, and usage describe different things: an allowance is what a plan includes, a credit balance is available prepaid value, and usage records the work performed. They should not be read as interchangeable totals.
Buy credits or redeem a code
- Choose Buy credits in Settings or from the sidebar.
- Choose one of the displayed amounts, or enter a custom amount.
- Review the total and click Buy … in credits.
- Complete checkout and return to Latted.
- Check the updated balance and Purchase History.
To use a coupon, enter it in Enter coupon code and click Redeem. Wait for the confirmation or error message before assuming it was applied.
Set up automatic credit reloads
Under Credits, check Auto-reload credits if you want Latted to top up when the balance gets low. Choose:
- Reload when below: the balance that triggers a top-up.
- Reload amount: the amount purchased each time that threshold is reached.
For example, a $5 threshold and a $25 reload amount means Latted purchases $25 of credits when the balance falls below $5. Check the saved toggle and amounts after making changes. Turn the toggle off if you want to make future purchases manually.
Add or change a payment method
In Payment Methods, choose Add card and complete the secure card setup in Stripe. Return to Latted to see the saved card. Make default selects which card is used for billing. A non-default card can be removed after confirmation; choose another default first if you are replacing the current default card.
The section identifies when cards are managed by your organization owner. Card details are stored and processed by Stripe.
Understand usage and history
Purchase History lists credit additions and their dates. Current Month Charges shows the current billing period and the usage total reported for it. Daily Usage shows how usage is distributed across the period. A note appears when charges are billed to the organization owner.
Use these views together: purchasing credits adds available balance, while generating content consumes the applicable allowance or balance or creates charges according to your billing arrangement.
If checkout completed but the balance has not updated, return to Settings and refresh once. Check Purchase History before buying again. For unresolved payment or usage questions, open Support Chat with the date, amount, and affected project or workflow link.
Subscription and account extras
If your account has a subscription, the Subscription section offers the actions available for that plan, such as changing or cancelling it. Read the confirmation for when the change takes effect. Some accounts with older billing arrangements show Switch to credits; its confirmation explains that the existing pay-as-you-go subscription will be cancelled.
Refer & Earn provides your referral link, code, and referral status. Use Copy to share the link yourself or Send invite to email a friend. Check the current qualification and reward wording on that page.
When available, Email Preferences shows your re-engagement email status and the related preference control. To sign out, expand the sidebar, click your profile at the bottom, and choose Sign out.
Prompt recipes you can copy
Build a first brief: describe your goal, audience, target length, and video shape. Identify the attached references, the story, the ending, and any facts that must stay accurate.
Use these examples in Create for a new project. For changes to a video already in Latted, open that project and use its Composer panel. Replace the example names, facts, and wording with your own approved information.
These are requests you can adapt. Review the result to confirm that the instructions were followed and that the video says what you intend.
Show how a product works
Prepare: screenshots or a short screen recording of the real workflow, plus the product name and the exact ending you want.
Make a 60-second landscape demo of our booking tool for a first-time salon owner. Use the attached recording to show adding a service, setting working hours, and copying the booking link. Explain each step in friendly English. Use readable callouts and gentle background music. End with “Create your booking page.” Show only the features in the recording and keep the interface wording accurate.
Review: whether the steps appear in the correct order, the interface text is readable, and each action matches the narration.
Make an explainer without an on-screen presenter
Prepare: a focused source document and any images or footage that should support the explanation. A “faceless” video explains a topic through narration and visuals without showing a speaking presenter.
Make a 90-second landscape explainer about how our reusable packaging return process works. Use the attached instructions as the source. Explain the three steps: empty the container, pack it in the return bag, and hand it to the collection driver. Use clear diagrams and close-up illustrations, friendly narration, and captions. Keep the pace calm enough for someone following the process for the first time. Include the exceptions stated in the source.
Review: whether the diagrams teach each step, all important exceptions are covered, and the words stay consistent with the source.
Introduce a product in a short social video
Prepare: product photos or footage, the audience, approved benefits, and a clear call to action—the next step you want the viewer to take.
Make a 25-second portrait introduction to our three-compartment lunch container for people who bring lunch to work. Use the attached product photos and packing footage. Show the compartments, the closed lid, and the packed lunch in that order. Use warm, practical narration and captions. End with “See the available colors.” Mention only the features listed in the attached brief. Avoid adding customer quotes, discounts, or guarantees.
Review: product appearance, factual claims, any visible text, and the exact final line.
Create a presenter-led product video
Prepare: attach a saved Character, a saved Voice if required, and the product material. Tell Latted which references have which role.
Create a 30-second portrait video in which the attached character introduces our desk lamp. Use the attached product images to show the adjustable arm and the two brightness controls. Use the attached voice for English narration. Keep the delivery conversational and straightforward. Add clear captions. End with “Explore the lamp.” Use the product facts in this brief and avoid inventing a personal testimonial or purchase story.
Review: the presenter and voice, product details, how naturally the explanation flows, and caption accuracy.
Change only the opening hook
A hook is the opening line or moment that introduces the video and gives someone a reason to keep watching. Use this in the existing project, or attach a source video to Create and describe it as the video to edit.
Replace the opening five seconds with a closer view of the product and the line “Lunch packed. Three compartments. Ready for the day.” Match the existing voice and update the opening captions. Keep the remaining scenes, narration, music, product details, and final call to action unchanged. Make the transition into the original body feel natural and keep the total duration as close to the original as possible.
Review: the new opening and the point where it joins the original body. Also check the remainder for unintended changes.
Change the final call to action
Prepare: approved ending text, the correct website or next step, and any offer details that must be included.
Change the final four seconds to say “Explore the available colors at Northline.” Show the product against a clean background with that exact text. Match the existing narrator and caption style. Keep the rest of the video, its scene order, music, and product claims unchanged. Do not add a price or discount. Leave enough time for the viewer to read the ending.
Review: the exact wording, readability, and the transition into the new ending.
Translate a video for a different audience
Prepare: the source video, a target language and market, and approved translations of product names, prices, and important phrases. Use the existing project or attach the video in Create.
Adapt this video for Spanish-speaking viewers in Mexico. Translate the narration, captions, and visible promotional text into natural Mexican Spanish. Keep the brand name “Northline” unchanged and end with “Conoce los colores disponibles.” Preserve the product, the meaning of each claim, and the order of the scenes. Keep the original price because no regional price has been approved. Tell me if any source wording needs clarification.
Review: speech, captions, names, prices, and meaning with someone who understands the target language and market. Check that translated wording fits comfortably on screen.
Adapt a wide video for a phone screen
Prepare: the existing project or source video, plus the target shape. In Create, also choose 9:16 Portrait under Output format.
Adapt this landscape video into a 9:16 portrait version for phone viewing. Keep the same story, narration, scene order, and final call to action. Reframe each scene so the speaker and product stay visible. Reposition and resize text so it is readable without covering faces or important controls. Keep captions within the picture and check every scene for cropped words, logos, or product details.
Review: every scene, especially wide screenshots, faces near the edge, captions, logos, and the ending. A change of shape may need different framing in different shots.
Add captions and make them easier to read
Prepare: the video with speech and the exact spelling of names or specialist terms.
Add English captions that match the spoken words throughout this video. Use clear white text with enough contrast to read over every scene. Keep captions away from the speaker’s face, the product name, and the buttons shown in the demo. Spell the brand “Northline.” Keep the existing footage, narration, music, and scene timing unchanged. Use short caption groups so viewers can read them comfortably.
Review: spelling, timing, line breaks, contrast, and whether captions obscure important information.
Use an approved script exactly
Prepare: one PDF, Markdown, or TXT file containing the approved script, plus the visual materials the video should use.
Create a 45-second landscape video using the attached approved script as the narration. Preserve its wording exactly, including the product name and final sentence. Use the attached product images and screen recording to illustrate each point. Keep the tone calm and professional, with captions and low background music. If the script will not fit comfortably within 45 seconds, tell me before shortening or rewriting it.
Review: the spoken words against the approved script, including the opening, numbers, product names, and ending.
Ask for a focused quality pass
Prepare: a project whose main content is already close to what you want. Turn on Extra careful in Composer settings when you want generated video inspected and visible mistakes retried.
Review this video for readable text, accurate captions, smooth scene joins, and clear narration. Check that music does not overpower the voice and that each scene remains visible for its intended duration. Fix the issues you find while keeping the approved script, scene order, product details, and ending unchanged. Explain any issue that needs a decision from me before making a larger change.
Review: the changes made and the final exported video. Keep a copy of an approved version before requesting a substantial revision.
Troubleshooting
Start with the message on the screen and the latest activity in the affected project or workflow. That usually tells you more than starting the request again.
| What you see | What to try |
|---|---|
| A file will not attach | Check the accepted format and the message beside the prompt. Create accepts one document at a time; PDFs can have up to 200 pages. |
| A Space selection exceeds limits | Attach a smaller folder or fewer items, then check the selected references before sending. |
| A project is still Planning, Starting, or Processing | Open its available project card and read the current activity. Media generation can continue between visible updates. Avoid submitting duplicates while the first task is still active. |
| No projects found | Clear the search and status filter, check the next page, and make sure you are in the intended organization. |
| An empty timeline | Add imported media to the timeline, or ask Composer to create the video. A conversation or library upload alone is not a finished video. |
| A clip is in the library but not in the preview | Add it to the timeline and move the playhead inside its time range. |
| An item is present but invisible | Check its time range, visibility, position, opacity, and whether another layer covers it. |
| No sound | Check the preview's mute and volume, then the selected clip's audio settings. Make sure the audio is on the timeline. |
| Music covers the voice | Lower the music clip's volume or ask Composer to lower it during speech. |
| Words in uploaded footage cannot be selected | They may be part of the picture. Ask Composer for the specific text change. |
| A media generation fails | Read the error, check the input, and retry when ready for another generation attempt. Keep successful results you can still use. |
| Save failed or a project conflict appears | Preserve your draft where offered. Follow the save or conflict message and verify saving before leaving. |
| Export says empty timeline | Add usable content to the timeline before exporting. |
| Export is complete but no file appeared | Check browser downloads. Use Download again or Open video when offered. |
| A workflow runs the old process | Publish the draft changes. New runs use the published version. |
| A workflow is waiting | Check for an approval request, missing input, or unavailable account connection. |
| Checkout completed but credits look unchanged | Refresh Settings once and check Purchase History before buying again. Contact Support Chat if it remains unresolved. |
Ask for help with the right context
Open Support Chat and include the project or workflow link, what you were trying to do, the exact message you saw, and the last action before it happened. For a visual problem, add the time in the video and describe the expected result.
For example: “In this project, the title disappears at 00:08. I expected it to stay until 00:11. This happens in the downloaded MP4 as well as the preview.” A screenshot can help show a missing control; the exported file helps explain a problem that only appears after downloading.
For billing questions, include the date and amount shown in your account. Do not send your password or full card details.
Frequently asked questions
Do I need video-editing experience?
No. Start on Create and describe the result you want. Review the first draft and ask Composer for specific changes. The manual editor is there when you want direct control over words, timing, layout, or sound.
Do I need to choose an AI model?
You can keep the default automatic selection. Focus first on your brief and references. Advanced models let you choose the assistant and media models when you have a particular reason to do so.
Can I use footage I already have?
Yes. Attach it to a Create request and say that it is the source video to edit, or use Import inside a project to place it yourself. Explain which parts should change and which should remain the same.
Will every reference I attach appear in the video?
No. A reference can guide the look, wording, voice, or factual content without appearing on screen. Say explicitly which files should be shown and which should only guide the work.
Can I make several versions?
Use Multi-Agent or ask Auto for a specific number of separate videos. Describe what should differ. Open and review each resulting project. When related tabs are present, the grouped export controls can collect them into one ZIP.
Does Stop undo the work or refund credits?
Stop requests that the active Composer task stop. It does not undo changes already made. Check your account's recorded usage for work already performed; stopping is not a refund action.
Is Composer history a backup of earlier video versions?
History reopens conversations. Use Undo for recent manual changes, and follow any recovered-draft or conflict options shown by the editor. Do not assume choosing an old conversation restores an old timeline.
Is my project the same thing as a downloaded video?
The project contains the editable work. Export prepares a finished file such as MP4. Saving the project and exporting the video are separate actions.
Can I share a project with my team?
People in the same organization can work with the organization's shared materials and projects. Use the project URL to help an existing teammate find the work. A project URL is not a public viewing link for people outside your organization. For a finished video, send the downloaded MP4 or publish through a configured workflow.
Does connecting a social account publish anything immediately?
Connecting makes that account available to supported workflow steps. The workflow's publishing action sends content to the selected destination. Review the content, destination, and approval settings before running that process.
Why did my costs change between attempts?
Requests can perform different amounts of generation and editing. New versions, retries, additional outputs, and Extra careful review can add work. Check the project or workflow's recorded usage and your account's billing information for the actual amounts.
Where should I start if there is a lot to learn?
Make one short video on Create, request one change in Composer, and export it. Add reusable Spaces and workflows when you want to repeat that process.